Partitioning an SSD on Windows 11 can sound like a daunting task, but it doesn’t have to be! Whether you’re looking to separate your operating system from your personal files, set up multiple operating systems, or simply keep your data more organized, partitioning can offer a host of benefits. In this guide, I’ll walk you through everything you need to know about partitioning an SSD on Windows 11. Let’s dive right in.
Why Partition Your SSD?
Before we get into the how-to, let’s talk about why you might want to partition your SSD in the first place.
Improved Data Organization
Partitioning divides your SSD into separate sections, allowing you to store different types of data in different partitions. For example, you can keep your operating system and applications on one partition and your personal files on another. This makes it easier to manage your files and can improve your overall system organization.
Enhanced Performance
By assigning different tasks to different partitions, you can reduce fragmentation and improve your SSD’s performance. For instance, you might create a partition specifically for resource-intensive applications like games, ensuring they have their own dedicated space.
Easy Backup and Recovery
With partitions, you can back up and restore specific sections of your SSD without affecting the rest. This means if something goes wrong with your operating system, your personal files on another partition remain safe and intact.
Security and Privacy
Partitioning can add an extra layer of security by isolating sensitive data. You can apply different access permissions and encryption to different partitions, making it harder for unauthorized users to access your sensitive information.
Multi-Boot Configurations
If you want to run multiple operating systems on your computer, partitioning is essential. Each operating system can have its own partition, allowing you to switch between them without interfering with each other’s data.

Things to Know Before Partitioning
Understanding SSD Partitioning
SSDs, or Solid State Drives, are physical storage devices that use NAND flash memory to store data. They’re faster and more reliable than traditional hard disk drives (HDDs). Like HDDs, SSDs can be partitioned to create separate storage areas.
MBR vs. GPT
When partitioning an SSD, you’ll need to choose between two partition schemes: MBR (Master Boot Record) and GPT (GUID Partition Table).
- MBR: Supports up to four primary partitions and is compatible with older BIOS systems.
- GPT: Supports up to 128 partitions and is required for systems using UEFI firmware, which is standard on modern computers. GPT is the recommended choice for Windows 11 to ensure compatibility and support for features like Secure Boot.
Sizing Your Partitions
How you size your partitions depends on your specific needs:
- For the Operating System (OS): Leave at least 100GB to 120GB for the OS partition to ensure Windows 11 has enough room to operate smoothly.
- For Data: Allocate the remaining space based on your storage needs. If you’re storing large files like videos or games, consider larger partitions.
Tools for Partitioning
Windows 11 offers several tools for partitioning your SSD:
- Disk Management: A built-in Windows tool that allows you to shrink, extend, create, and format partitions.
- DiskPart: A command-line tool that provides advanced partitioning capabilities.
- Third-Party Software: Programs like EaseUS Partition Master and AOMEI Partition Assistant offer user-friendly interfaces and additional features for managing partitions.
How to Update Drivers on Windows 11
How to Partition an SSD in Windows 11
Now that we’ve covered the basics, let’s get into the step-by-step process of partitioning your SSD in Windows 11. We’ll start with the built-in Disk Management tool, then look at using DiskPart, and finally, explore third-party software options.
Method 1: Using Disk Management
The Disk Management tool is a built-in utility in Windows 11 that makes partitioning straightforward.
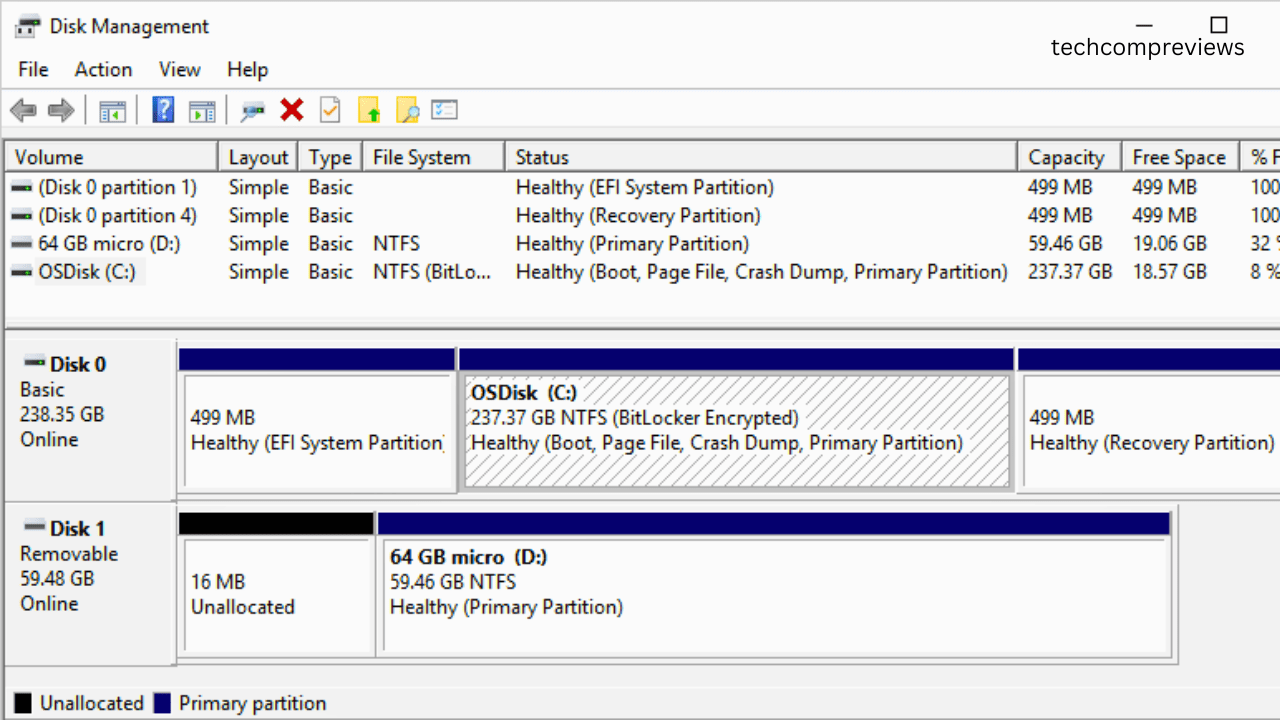
Step 1: Open Disk Management
- Press
Windows + Sto open the search bar. - Type “Create and format hard disk partitions” and select the result to open Disk Management.
Step 2: Shrink a Volume to Create Unallocated Space
- In Disk Management, right-click the partition you want to shrink (e.g., C: drive).
- Select “Shrink Volume.”
- Enter the amount of space to shrink (in MB) and click “Shrink.”
Step 3: Create a New Partition
- Right-click the unallocated space created by shrinking the volume.
- Select “New Simple Volume.”
- Follow the wizard to assign a drive letter, format the partition, and specify its size.
- Click “Finish” to create the new partition.
Repeat these steps if you want to create more partitions from the remaining unallocated space.
Method 2: Using DiskPart
DiskPart is a command-line utility that offers more advanced partitioning options.
Step 1: Open Command Prompt
- Press
Windows + S, type “cmd”, and select “Run as administrator” to open Command Prompt with elevated privileges.
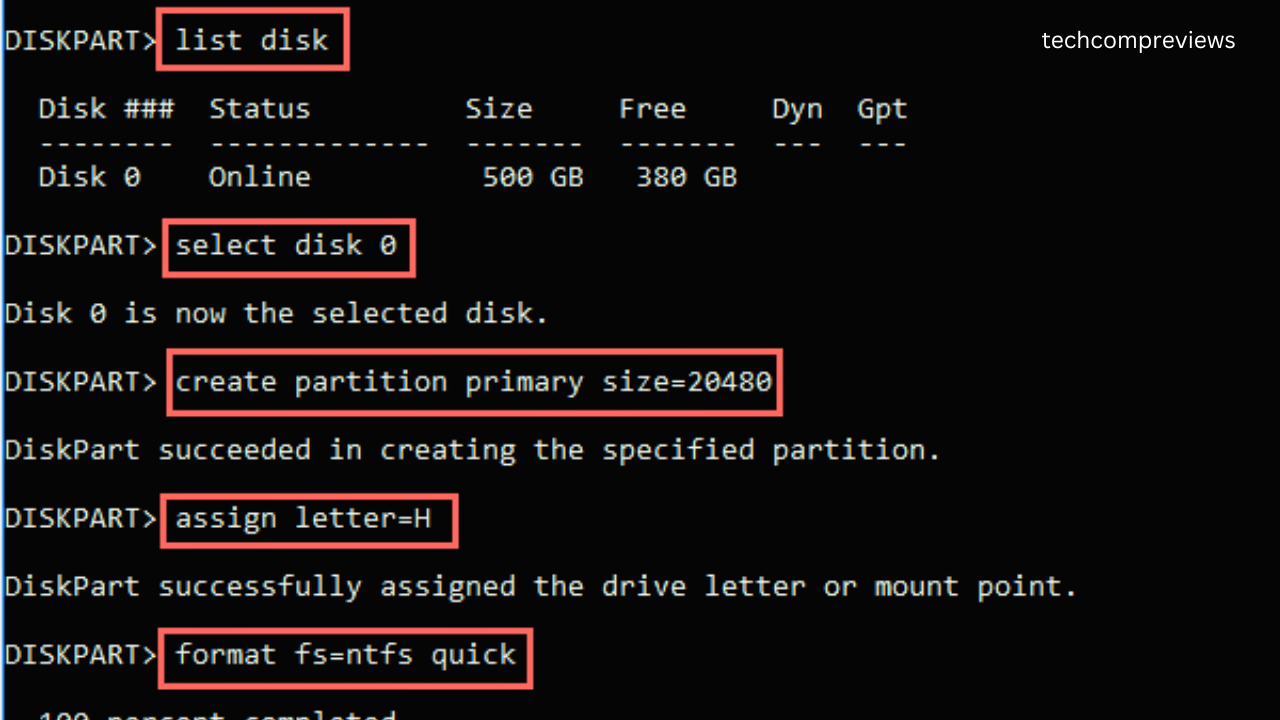
Step 2: Use DiskPart Commands
- Type
diskpartand press Enter to start DiskPart. - Type
list diskto display a list of disks. - Select your SSD by typing
select disk X(replace X with your SSD’s number). - If there’s unallocated space, type
create partition primary size=XXXX(replace XXXX with the desired size in MB). - Assign a drive letter by typing
assign letter=X(replace X with your desired drive letter). - Format the partition by typing
format fs=ntfs quick.
If there’s no unallocated space:
- Type
list volumeto see existing volumes. - Select a volume to shrink by typing
select volume X(replace X with the volume number). - Shrink the volume by typing
shrink desired=XXXX(replace XXXX with the desired shrink size in MB). - Create a new partition with the above commands for unallocated space.
Method 3: Using Third-Party Software
If you prefer a more user-friendly interface or need additional features, third-party software like EaseUS Partition Master or AOMEI Partition Assistant is a great choice.
Step 1: Download and Install the Software
- Download EaseUS Partition Master or AOMEI Partition Assistant from their respective websites.
- Install the software on your computer.
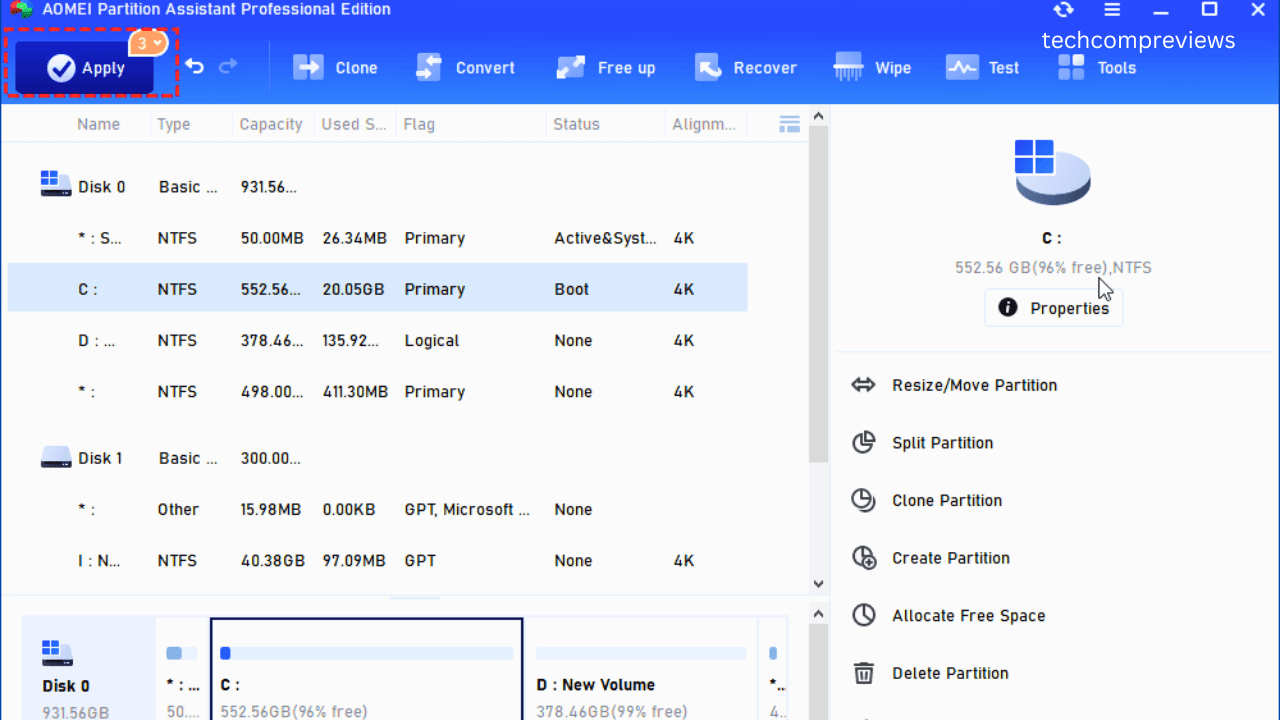
Step 2: Launch the Software and Partition Your SSD
- Open the software and locate your SSD in the interface.
- Select the partition you want to shrink and choose the “Resize/Move” option.
- Adjust the partition size to create unallocated space.
- Select the unallocated space and choose “Create Partition.”
- Follow the prompts to specify the size, file system, and drive letter for the new partition.
- Click “Apply” to execute the changes.
Best Practices and Tips
Backup Your Data
Before making any changes to your partitions, it’s crucial to back up your important data. Partitioning operations can sometimes lead to data loss if something goes wrong.
Leave Adequate Space for the OS
Ensure that your OS partition has enough space to function efficiently. Windows 11 typically requires at least 100GB to 120GB for smooth operation.
Use the Right Tools for Your Needs
While Disk Management is great for basic partitioning, consider third-party tools for more advanced features and ease of use. Tools like EaseUS Partition Master and AOMEI Partition Assistant offer additional functionality like merging partitions, converting file systems, and recovering lost partitions.
Regularly Check Partition Health
Use built-in tools or third-party software to regularly check the health of your partitions and SSD. Monitoring tools can alert you to potential issues like bad sectors or alignment problems.
Optimize SSD Performance
To ensure your SSD performs optimally, periodically check for firmware updates and enable features like TRIM, which helps maintain the performance of SSDs over time.
Consider Future Needs
When partitioning your SSD, think about your future needs. Leave some unallocated space if you anticipate needing additional partitions later. This will save you from having to resize existing partitions in the future.
Conclusion
Partitioning your SSD in Windows 11 can greatly enhance your system’s organization, performance, and security. Whether you’re using the built-in Disk Management tool, the DiskPart command-line utility, or third-party software, the process is straightforward and manageable. By following the steps outlined in this guide, you can efficiently partition your SSD to meet your specific needs.
Remember to always back up your data before making changes to your partitions, leave adequate space for your operating system, and use the right tools for your needs. With these tips and best practices, you’ll be well on your way to a more organized and efficient computing experience. Happy partitioning.
Read Also:
Acer Chromebook Plus 516 GE Review: A Gaming Chromebook (2024)