Keeping your Windows 11 drivers up to date is essential for ensuring your system’s optimal performance, stability, and security. Whether you’re a seasoned tech enthusiast or a casual user, updating drivers can sometimes seem daunting. But fear not! In this guide, I’ll walk you through everything you need to know about updating drivers on Windows 11, step by step, with a friendly and approachable tone. Let’s dive in.
Why Update Your Drivers?
The software components known as drivers enable communication between your hardware and operating system. Keeping them updated is crucial for several reasons:
- Enhanced Performance: Updated drivers can unlock new features and optimize your hardware, ensuring you get the best performance.
- Improved Stability: New drivers often fix bugs and compatibility issues, reducing crashes and glitches.
- Better Security: Driver updates can patch security vulnerabilities, protecting your PC from potential threats.
When to Update Your Drivers
Before we jump into how to update drivers, let’s talk about when you actually need to update them.
You Usually Don’t Need to Update Drivers
For the most part, if your devices are working fine, there’s no need to update their drivers. The old saying “If it ain’t broke, don’t fix it” holds true here. Unnecessary updates can sometimes cause more harm than good by introducing new issues.
Specific Scenarios for Driver Updates
However, there are specific situations when updating drivers is necessary:
- Installing New Hardware: When you add new hardware like a graphics card, printer, or other peripherals, you should ensure the drivers are up to date.
- Facing Hardware Issues: If you’re experiencing problems with a device, such as a malfunctioning touchpad or USB port, updating the driver might resolve the issue.
- Optimizing Performance for Games: Gamers often need to update graphics drivers to improve performance and compatibility with new games.
How to Update Drivers on Windows 11
There are several methods to update drivers on Windows 11, each with its own advantages. I’ll cover the following methods:
- Windows Update
- Device Manager
- Manufacturer’s Website
- Third-Party Software
1. Using Windows Update
Windows Update is the simplest and safest way to keep many of your drivers up to date. Here’s how you can do it:
Step-by-Step Guide:
- Open Settings: Press
Windows + Ito open the Settings app. - Go to Windows Update: In the left sidebar, click on Windows Update.
- Check for Updates: Click the Check for updates button. Windows will automatically search for and install any available driver updates.
Optional Updates:
Sometimes, driver updates are listed as optional updates. To access these:
- Advanced Options: In the Windows Update section, click on Advanced options.
- Optional Updates: Scroll down and select Optional updates.
- Driver Updates: Expand the Driver updates section, check the boxes next to the drivers you want to update, and click Download & Install.
Windows Update is a reliable way to get driver updates directly from Microsoft, ensuring they’re tested and verified.
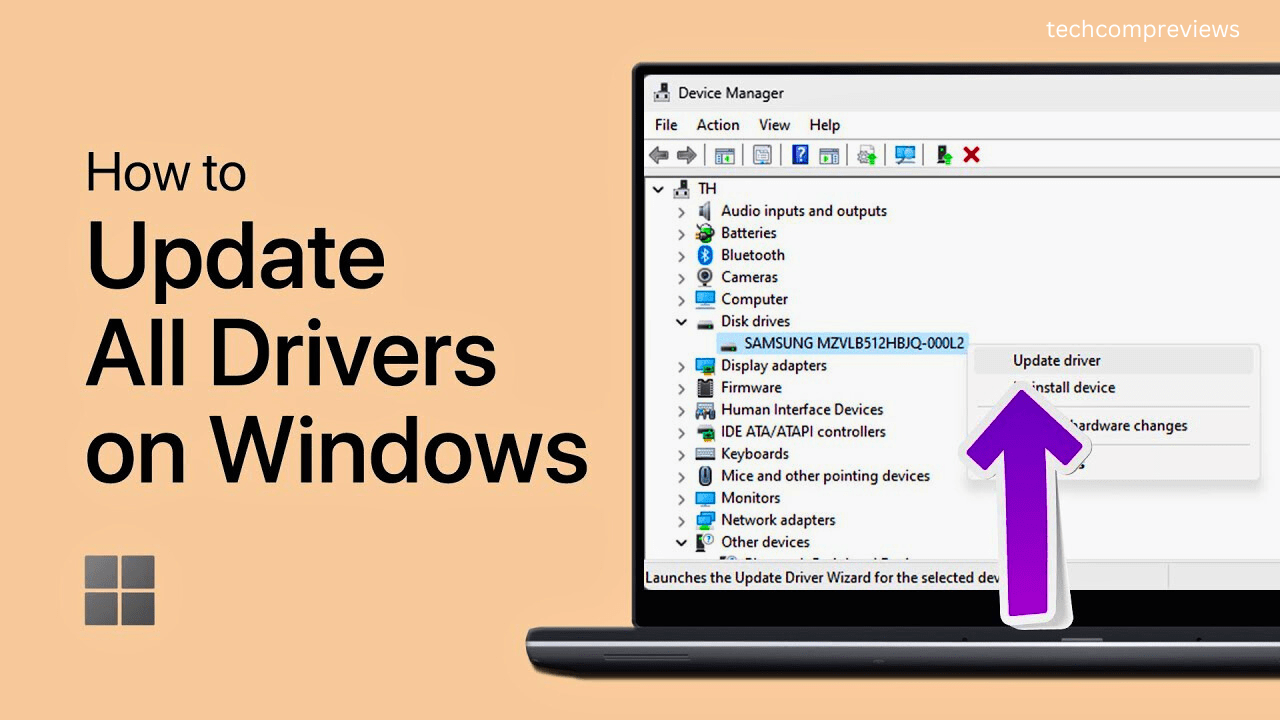
2. Using Device Manager
For more control over individual driver updates, you can use Device Manager. This tool allows you to manually update, uninstall, or roll back drivers.
Step-by-Step Guide:
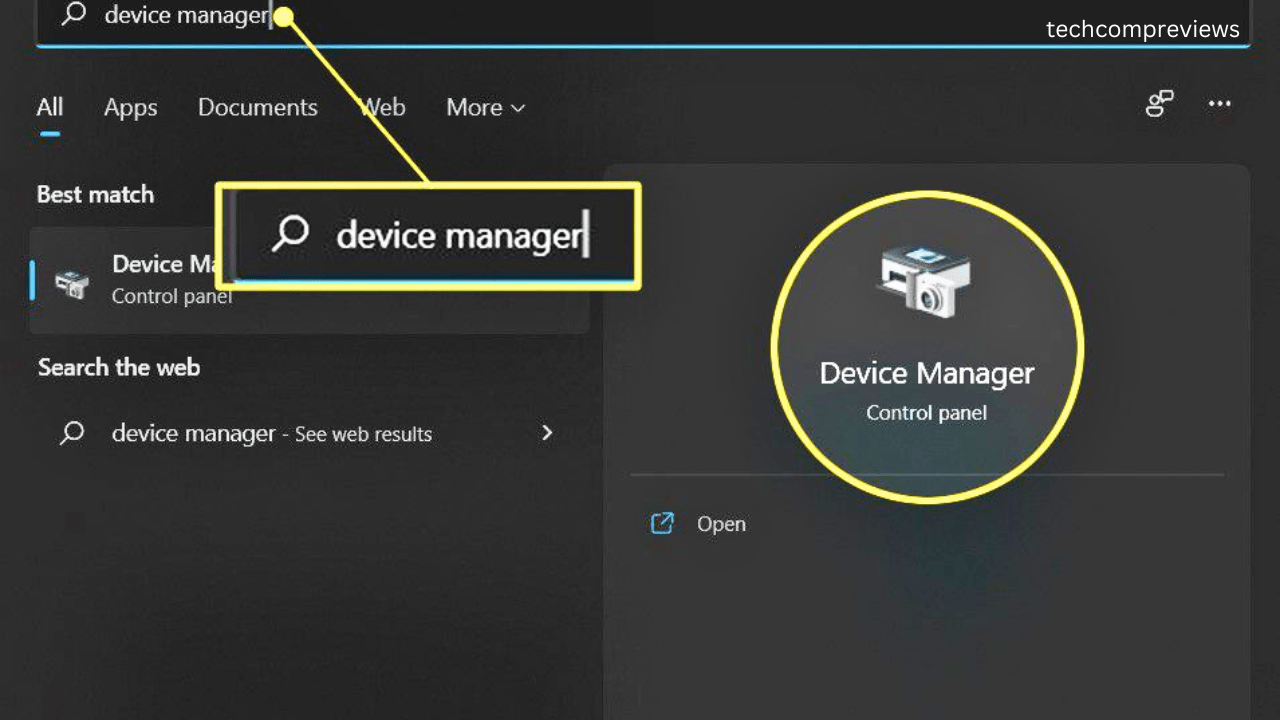
- Open Device Manager: Right-click the Start button and select Device Manager from the context menu.
- Find Your Device: Locate the device you want to update in the list. Devices are categorized, so you might need to expand a category (e.g., Display adapters for your graphics card).
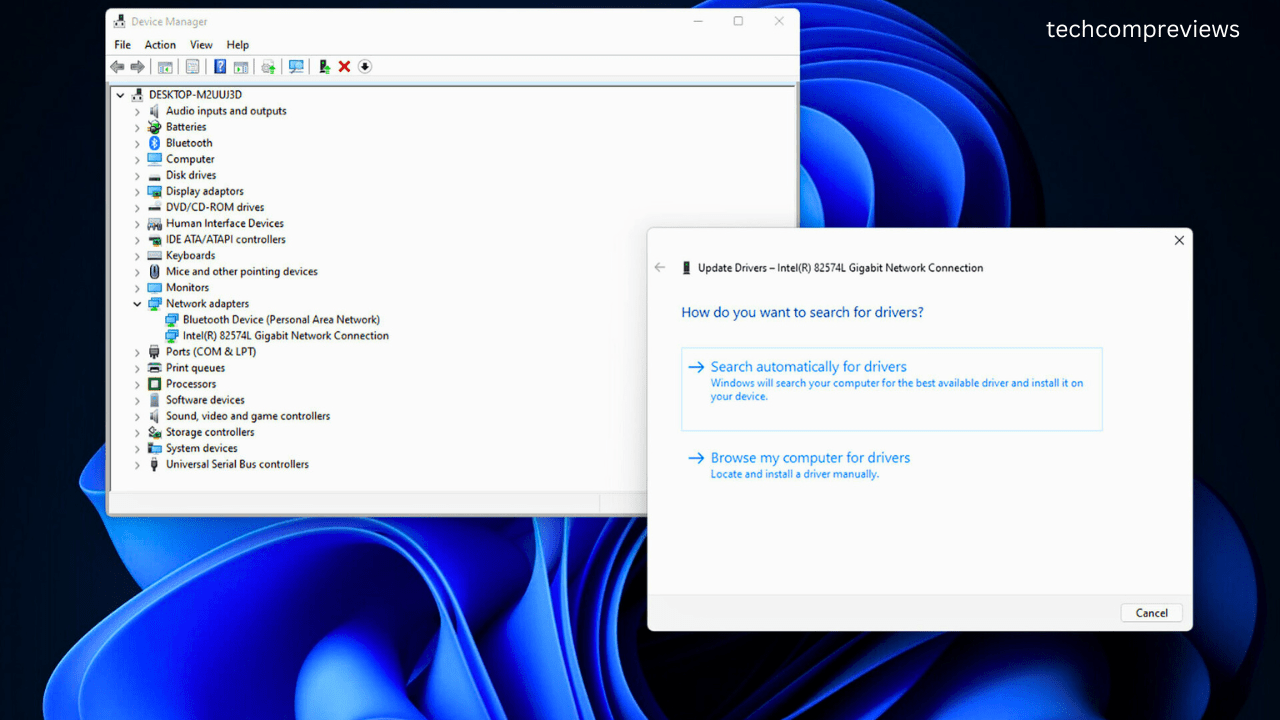
- Update Driver: Right-click the device and select Update driver.
- Choose Update Method:
- Search automatically for drivers: Windows will search your system and the internet for the latest drivers.
- Browse my computer for drivers: Use this option if you have already downloaded the driver from the manufacturer’s website. Navigate to the folder where the driver is saved and select it.
Device Manager provides a straightforward way to update drivers for specific devices without waiting for Windows Update.
3. Downloading Drivers from the Manufacturer’s Website
For the latest and most specific drivers, especially for critical components like graphics cards, visiting the manufacturer’s website is often the best option.
Step-by-Step Guide:
- Identify Your Device: Find the make and model of your device. This information is usually available in Device Manager or on the device itself.
- Visit the Manufacturer’s Website: Go to the official website of the device manufacturer (e.g., Dell, HP, NVIDIA, AMD).
- Navigate to the Support Section: Look for sections labeled Support, Drivers, or Downloads.
- Find the Correct Driver: Use your device’s model number to locate the appropriate driver.
- Download and Install: Download the driver and follow the installation instructions. This often involves running a setup program and restarting your computer.
4. Using Third-Party Software
Several third-party programs can automate the driver update process. These tools can be convenient but should be used with caution to avoid malware.
Recommended Third-Party Tools:
- Driver Easy: This software scans your system for outdated drivers and updates them automatically. The Pro version offers additional features like one-click updates.
- Snappy Driver Installer: An open-source tool that provides access to a vast driver database and allows offline updates.
Step-by-Step Guide:
- Download and Install: Download the software from the official website and install it on your computer.
- Scan for Drivers: Open the software and click Scan Now or similar. The tool will identify outdated or missing drivers.
- Update Drivers: Select the drivers you want to update and click Update. Follow the on-screen instructions to complete the process.
Using third-party tools can save time, especially if you have multiple drivers to update, but always ensure you download from reputable sources.
How to Update Specific Drivers
Updating Graphics Drivers
Graphics drivers are crucial for gaming, video editing, and other graphic-intensive tasks. Here’s how to update them:
For NVIDIA Graphics Cards:
- GeForce Experience: Download and install NVIDIA GeForce Experience.
- Open GeForce Experience: Launch the program and log in.
- Check for Updates: Click on the Drivers tab and then Check for updates. Download and install any available updates.
For AMD Graphics Cards:
- AMD Radeon Software: Download and install AMD Radeon Software.
- Open Radeon Software: Launch the program.
- Check for Updates: Click on the Updates tab and follow the prompts to install any available updates.
For Intel Graphics:
- Intel Driver & Support Assistant: Download and install the Intel Driver & Support Assistant.
- Run the Assistant: It will automatically detect and update your Intel graphics drivers.
Updating Audio Drivers
Audio issues can often be resolved by updating audio drivers.
Step-by-Step Guide:
- Open Device Manager: Right-click the Start button and select Device Manager.
- Locate Audio Drivers: Expand the Sound, video and game controllers section.
- Update Driver: Right-click your audio device (e.g., Realtek High Definition Audio) and select Update driver.
- Follow the Prompts: Choose Search automatically for drivers and let Windows update the driver.
Updating Network Drivers
For network issues, updating network drivers can help.
Step-by-Step Guide:
- Open Device Manager: Right-click the Start button and select Device Manager.
- Locate Network Adapters: Expand the Network adapters section.
- Update Driver: Right-click your network device (e.g., Intel(R) Ethernet Connection) and select Update driver.
- Follow the Prompts: Choose Search automatically for drivers and let Windows update the driver.
How to Roll Back a Driver Update
Sometimes, a new driver update can cause issues. In such cases, you may need to roll back to a previous version.
Step-by-Step Guide:
- Open Device Manager: Right-click the Start button and select Device Manager.
- Locate the Device: Find the device causing issues and right-click it.
- Roll Back Driver: Select Properties and go to the Driver tab. Click Roll Back Driver.
- Follow the Prompts: Complete the rollback process and restart your computer.
How to Uninstall a Driver
If you need to completely remove a driver, follow these steps:
Step-by-Step Guide:
- Open Device Manager: Right-click the Start button and select Device Manager.
- Locate the Device: Find the device whose driver you want to uninstall and right-click it.
- Uninstall Driver: Select Uninstall device. Check the box that says Delete the driver software for this device if available.
- Confirm: Click Uninstall and restart your computer.
Troubleshooting Driver Update Issues
Driver Installation Fails
If a driver installation fails, try the following:
- Re-download the Driver: The file might be corrupted.
- Run as Administrator: Right-click the setup file and select Run as administrator.
- Disable Antivirus: Temporarily disable your antivirus software during installation.
Device Not Working After Update
If a device stops working after a driver update:
- Roll Back the Driver: Follow the rollback steps above.
- Check Compatibility: Ensure the driver is compatible with your version of Windows 11.
- Contact Support: Reach out to the device manufacturer for further assistance.
Conclusion
Updating drivers on Windows 11 is a key part of maintaining your PC’s health and performance. Whether you choose to update via Windows Update, Device Manager, manufacturer websites, or third-party tools, keeping your drivers up to date will help ensure your system runs smoothly. Always back up your system and drivers before making significant changes, and don’t hesitate to seek professional help if needed. Happy computing.
Read Also: